![Gruppe von Jugendlichen [cbquestionnaires_inputCode_image-alttext #]](/_assets/2bf4e054e707ac7e8953a2c2c94c8432/Images/Illu_i-konf.png)
Help and FAQ
A step-by-step guide to surveys with i-konf
These pages give an overview of the most important steps for conducting a confirmation survey with the online tool i-konf.
The liked video provides a step-by-step guide to setting up and conducted a survey.
If you still have questions or problems with the tool that are not covered in this tutorial, please contact us by email at info@konfirmandenarbeit.eu.
We recommend that you conduct a first survey at the beginning of confirmation time using questionnaire t1, which covers confirmands’ wishes, expectations and motivations, and a second survey with questionnaire t2 (covering goal fulfillment, feedback, further wishes) 1-3 weeks before the confirmation. You can customise questionnaires by adding or deleting questions.
Start the survey by sharing the questionnaire link or QR code to respondents, so they can fill out the survey via smartphone. Alternatively, you can also use paper questionnaires.
Close the survey and directly receive all results of your group/respondents.
You will find detailed help in the following sections.
Step 1: Registration on i-konf
Registration as a parish
Go to the registration page. Please take note of our terms and conditions of use and enter a valid e-mail address. You will receive an e-mail with a link to confirm your registration. Click on the link and set your own password.
Registration as a central office/ umbrella organisation
You are, for example, active on a regional church level and would like to evaluate several confirmation surveys together? With i-konf this is easily possible if you register as a central office.
As a registered central office/umbrella organisation, you have the possibility to get an overall evaluation of all surveys assigned to you or a selection of them. You can filter the surveys according to different criteria and save the selection. In order to be activated as a central office, please write an e-mail to info@konfirmandenarbeit.eu.
You will then receive anonymized access to the data of all parishes that enter the designation you have chosen under "central office/umbrella organisation" in the system.
Step 2: Conduct survey
Step 1: Create new survey
Log in with the access data from step 1.
To create a new survey , click on "Create new survey". You will be provided with a form in which you can enter some details about your confirmation group and survey.
When creating a survey, you will find a small blue "i" next to each input field. Click it, to recieve further explanations about the chosen input fields.
Specify the starting point and, if possible, an end time (approximate dates are sufficient, the date is only for your own assignment) and select the questionnaire type and the country. If you want, you can grant us permission to use your data for scientific purposes. The anonymity of your community and participants will be preserved!
Note: The fields marked with an * are mandatory fields!
Finally, click on "Save" and on "Continue to conduct the survey".
The survey has now been successfully created and two questionnaires have been stored in the system: one for the confirmands and one for the workers.
Step 2: Edit questionnaires (optional)
To adapt the questionnaires for the confirmands or workers to your specific needs, click on the button "View and adapt questionnaires".
You will now see all the questions contained in the respective questionnaire by default.
Depending on the questionnaire type, modules on different topics are available. You can add a whole module by ticking the corresponding box.
You also can remove up to 10 questions from the standard questionnaire, by removing the checkmark on the right.
In addition, you can add your own questions and translate them into the desired languages. Open questions, scaling questions or multiple-choice questions are possible.
Don't forget to save your changes in the end.
Step 3: Conduct survey
The survey can begin as soon as you have clicked on "Start survey" on the "Polling" page (for both confirmands and workers).
Provide the 9-letter code (master code) found on the same page, the link or the QR code to the confirmands or workers of your survey so that they can participate in it. The respondents can then easily complete the survey on their smartphones.
The system also allows you to invite respondents individually by email. To do this, either enter the respondents' mail addresses individually under "Use individual codes" or upload a CSV file with the email addresses. Select the language/s in which the respondents should be invited. Each respondent will then receive an email with an individualized link that will take them directly to their own questionnaire. The links are not stored in the system and are not used in any other way.
A third possibility is that you create and download (also under "use individual codes") a list of individually usable codes. You distribute these codes to the people to be interviewed: Only one code per person! For example, you can post the list and each crosses out the code he:she used. Even better is to cut out the printed codes and distribute the small pieces of paper. The code is to be entered on the i-konf home page. After entering the code, the respondent is automatically directed to the correct questionnaire and can fill it out.
Do the same with the “Survey of the workers”.
Step 4: Close survey
On the dashboard you are able to see how many confirmands or workers have already filled in a questionnaire or are in the process of doing so at any time ("Codes in use").
When all codes have been used to complete the survey and you have finished the polling, you can "close the survey" by clicking on the lock icon on the dashboard or on the survey page. (Closing the survey can be reversed at any time, e.g. if confirmands subsequently still want to complete a questionnaire.)
After closing the survey, you will be asked to provide some further information about the general conditions of the survey.
After that, you can view your result of the survey.
Step 3: Evaluate the results
1. View, share and download results
After closing the survey, the results of the survey appear in different forms: By clicking on the desired question, you will receive a chart for each, as well as the mean and standard deviation, and you can export them as different image or document formats.
- PDF "all results": This detailed document contains a graph for each question of the questionnaire as well as basic statistical key figures.
- The raw data can be downloaded as a CSV file and then openden with professional statistic programs such as SPSS.
- In the document "Compact Evaluation" you will find the results summarized on three pages. This should be the most common evaluation for most purposes.
- The Excel file "Goals-Results-Comparison" directly compares the goals of the workers with the statements of the participants. Note: In order to generate this file, both surveys (confirmands and workers) must be closed
You can also easily pass on the compact evaluation, e.g. to the staff team. To do this, select "Publish compact evaluation" on the results page. When you confirm this selection, the compact evaluation will be available online on a public link. You can share the link by e-mail, for example.
To view and download the results in the other languages, simply switch to the corresponding language version of the page by using the language button at the top right corner.
2. Combine results of several confirmation surveys (for umbrella organisations)
Combining the results of several confirmation surveys:
For example, to merge the results of all confirmation surveys of one year or over several years and to be able to evaluate them together, click on the button "Create new combined evaluation" at the bottom of the dashboard. Note: This function is only available, when you are registered as an umbrella organisation (see "registration as a central office/ umbrella organisation" in Step No. 1).
On the following page, you name the evaluation (e.g. "All confirmation surveys 2022, confirmands") and select the group of respondents whose results you want to merge. Only results from the same group (i.e. only confirmands or workers questionnaires) can be combined. After clicking on "filter" you will only see the corresponding surveys in the list. Additionally you can filter by questionnaire type, start and end dates of the confirmation time, as well as by the number of confirmands or workers.
Select the surveys whose results you would like to combine by marking them with a check mark in the first column. Then click on "Create combined evaluation". You will be redirected back to your dashboard. Click on the title of your combined evaluation. This will take you to the download page of your combined evaluation.
Please note: If the questionnaire of one of the selected surveys is subsequently reopened by the organizers in order to get additional answers of confirmands or wokers, the new data will automatically be integrated after the survey is closed the next time. It may therefore be worthwhile to always download the current pdf or Excel files from the system if they are to be used for evaluations, team meetings or similar.
Tips for conducting the survey
The survey can be conducted using a smartphone or any other Internet-enabled device.
How you want to integrate the survey into your confirmation time is up to you. However, we would like to show you three different options that simplify the conduction of the survey.
Don't forget to start the survey of both the confirmands and the workers beforehand (see "Step 2: Conducting the survey")!
Option 1: Print/letter survey link
The confirmands open www.i-konf.eu in the browser of their smartphone. It is recommended to write or print this on a DIN A4 sheet of paper beforehand so that it can be read easily.
The confirmands then enter the survey code (Master-Code) in the field "Enter your code here" and press "Start". They are taken directly to the questionnaire. You find the Master-Code in your user account on i-konf (Conducting the survey). It is also recommended that you print it out or write it down beforehand.
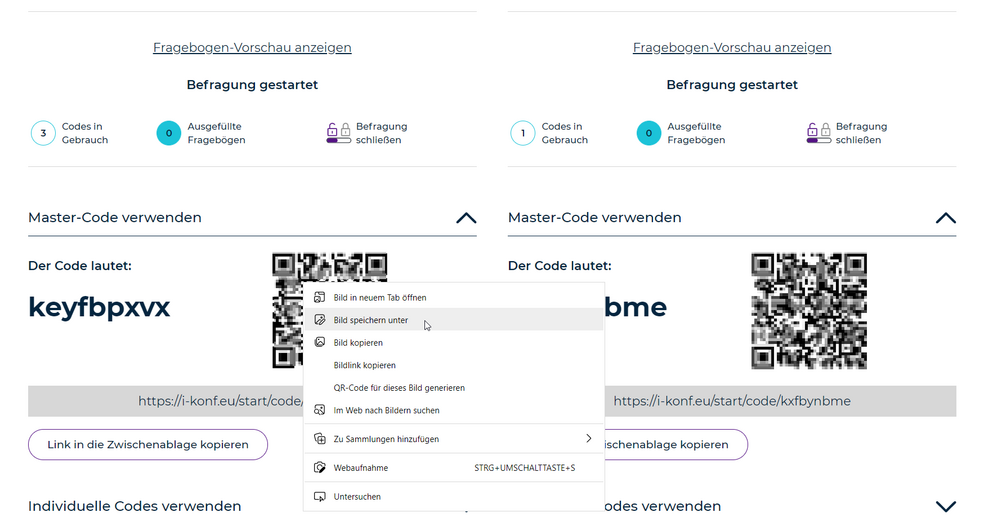
Option 2: Use QR code
The survey code (master code) can be printed out in the form of a QR code and scanned by the confirmands with their cell phone camera.
You can find the QR code in your user account on i-konf (Conducting the survey). To print it out, right-click on the QR code and then select "Save image as" and save the image locally on your computer at the desired location. Now you can print the QR code or send it digitally to your confirmands.
The confirmands can then scan this QR code with their smartphone cameras and go directly to the survey. In this case there is no need to enter the link and the Master-Code manually.
Option 3: Forward survey link
In the "Conducting the survey" section you will also find the "Copy link to clipboard" button. By clicking on it, the survey link is automatically copied to the clipboard and you can then paste it to the desired location (keyboard shortcur Ctrl/Cmd + V).
After that send the link to the confirmands, for example by e-mail or KonApp. This will take the confirmands directly to the questionnaire.